
Snowflake Time Travel allows you to access previous snapshots of your data objects, such as tables, schemas, and databases. You can access these snapshots at any point within the specified data retention period.
Time travel in Snowflake, combined with the UNDROP SQL command helps you recover from running unintended, accidental operations on the database, such as DELETE FROM, TRUNCATE TABLE, or DROP TABLE commands.
In this article, we're going to kick things off by diving into Snowflake's Time Travel functionality and see how pairing it with the CLONE command can help us recover dropped objects. We'll also explore setting the data retention period for data objects, what fail-safe is, and understand how it works. In the end, we will explore how we can extend these concepts to code, by coupling code and data together in a stateful data system. We'll do so just by using Git, so you can safely restore any previous snapshot of your objects from your data warehouse based on a Git commit.
How to restore a dropped object?
If you're anxiously Googling because you dropped your production table: you can use the Snowflake UNDROP TABLE command. Calling UNDROP restores the latest version of a table before issuing the DROP command:
UNDROP TABLE my_table;
You can call UNDROP on schema or database objects as well:
UNDROP SCHEMA my_schema;
UNDROP DATABASE my_database;
Viewing dropped objects
The SHOW TABLES Snowflake command lists all current tables within a schema. To also see the dropped variations of a table, you can use the SHOW TABLES HISTORY command. This command also works with schemas or database objects:
SHOW TABLES HISTORY LIKE 'my_table%' IN my_db.my_schema;
SHOW SCHEMAS HISTORY IN my_db;
SHOW DATABASES HISTORY;
The output of these commands includes all dropped objects, along with an additional DROPPED_ON column that indicates the timestamp when each object was dropped. If an object was dropped more than once, the output will list each instance of the object as a separate row.
It's important to note that while tables, schemas, and databases can be restored in Snowflake, views dropped through a DROP VIEW command cannot be restored and must be recreated. To prevent the loss of your view objects, we recommend saving the definition of your views in a version control system like Git.
Time Travel syntax
To query previous versions of an object, Snowflake provides several methods, including:
AT(TIMESTAMP => '<TIMESTAMP>')AT(OFFSET => -<NUMBER_OF_SECONDS>)BEFORE(STATEMENT => '<STATEMENT_ID>')
You can find the STATEMENT_ID of a particular query from the Query History tab.
For example, to retrieve data from 10 minutes ago, you can use:
SELECT * FROM fact_salesorder AT(OFFSET => -60*10); -- Retrieves data from 10 minutes ago.
You can also calculate the TIMESTAMP for a specific point in the past using SQL timestamp functions. For instance, to access data from 10 minutes ago, you can use:
SELECT * FROM fact_salesorder AT(TIMESTAMP => CURRENT_TIMESTAMP - INTERVAL '10 minutes');
To use the BEFORE(STATEMENT => '<STATEMENT_ID>') method for querying a previous version of an object before a specific operation, you can retrieve the STATEMENT_ID from the Query History view of that particular query that changed the state of the object. This functionality is particularly useful for pinpointing and restoring data to its state prior to a specific change or operation.
SELECT * FROM fact_salesorder BEFORE(STATEMENT => '01b2e93f-0202-7142-0000-e9a101f45cea');
Cloning past snapshots of an object
You can materialize any previous snapshot in the database by using the CLONE keyword in the CREATE command. For example:
CREATE TABLE fact_salesorder_restored CLONE fact_salesorder AT(OFFSET => -60*10); -- Creates a copy of the table as it was 10 minutes ago.
This feature is especially useful after using the Snowflake truncate table or Snowflake delete rows commands (i.e., DELETE FROM my_table WHERE <condition>).
Conversely, you can restore schemas or databases using the CLONE command:
CREATE SCHEMA schema_restored CLONE my_schema AT(TIMESTAMP => '2024-03-08 10:12:00 +0300'::timestamp_tz)
CREATE DATABASE db_restored CLONE my_db  BEFORE(STATEMENT => '01b2c3dd-0202-6a71-0000-e9a101e1cdb2');
The command might fail for databases and schemas if they contain child objects (schemas or tables) whose Time travel period has expired. To mitigate this issue, use the IGNORE TABLES WITH INSUFFICIENT DATA RETENTION parameter:
CREATE DATABASE db_restored CLONE my_db BEFORE(STATEMENT => '01b2c3dd-0202-6a71-0000-e9a101e1cdb2') IGNORE TABLES WITH INSUFFICIENT DATA RETENTION;
Data retention period
The standard retention period is 1 day and is automatically applied to all objects within an account. For Snowflake Enterprise or higher tiers, this retention period can be increased up to 90 days (excluding transient or temporary tables). To modify the retention period of an object, the DATA_RETENTION_TIME_IN_DAYS configuration can be used:
ALTER TABLE mytable SET DATA_RETENTION_TIME_IN_DAYS=30;
Only users with the ACCOUNTADMIN role can specify the DATA_RETENTION_TIME_IN_DAYS at the account level, which will then act as the default value for all objects within the account.
A user with the ACCOUNTADMIN role can also set a minimum data retention time at the account level with the MIN_DATA_RETENTION_TIME_IN_DAYS parameter. This setting enforces a minimum data retention period across all databases, schemas, and tables within the account. When MIN_DATA_RETENTION_TIME_IN_DAYS is configured at the account level, the data retention period for an object within the account becomes the maximum of DATA_RETENTION_TIME_IN_DAYS and MIN_DATA_RETENTION_TIME_IN_DAYS parameters.
To override the account default when creating a new table, schema, or database, include the DATA_RETENTION_TIME_IN_DAYS parameter in the creation command:
CREATE TABLE my_table(col1 NUMBER, col2 DATE) DATA_RETENTION_TIME_IN_DAYS=90;
It's also possible to disable Time Travel for an object by setting the retention period to 0:
ALTER TABLE my_table SET DATA_RETENTION_TIME_IN_DAYS=0;
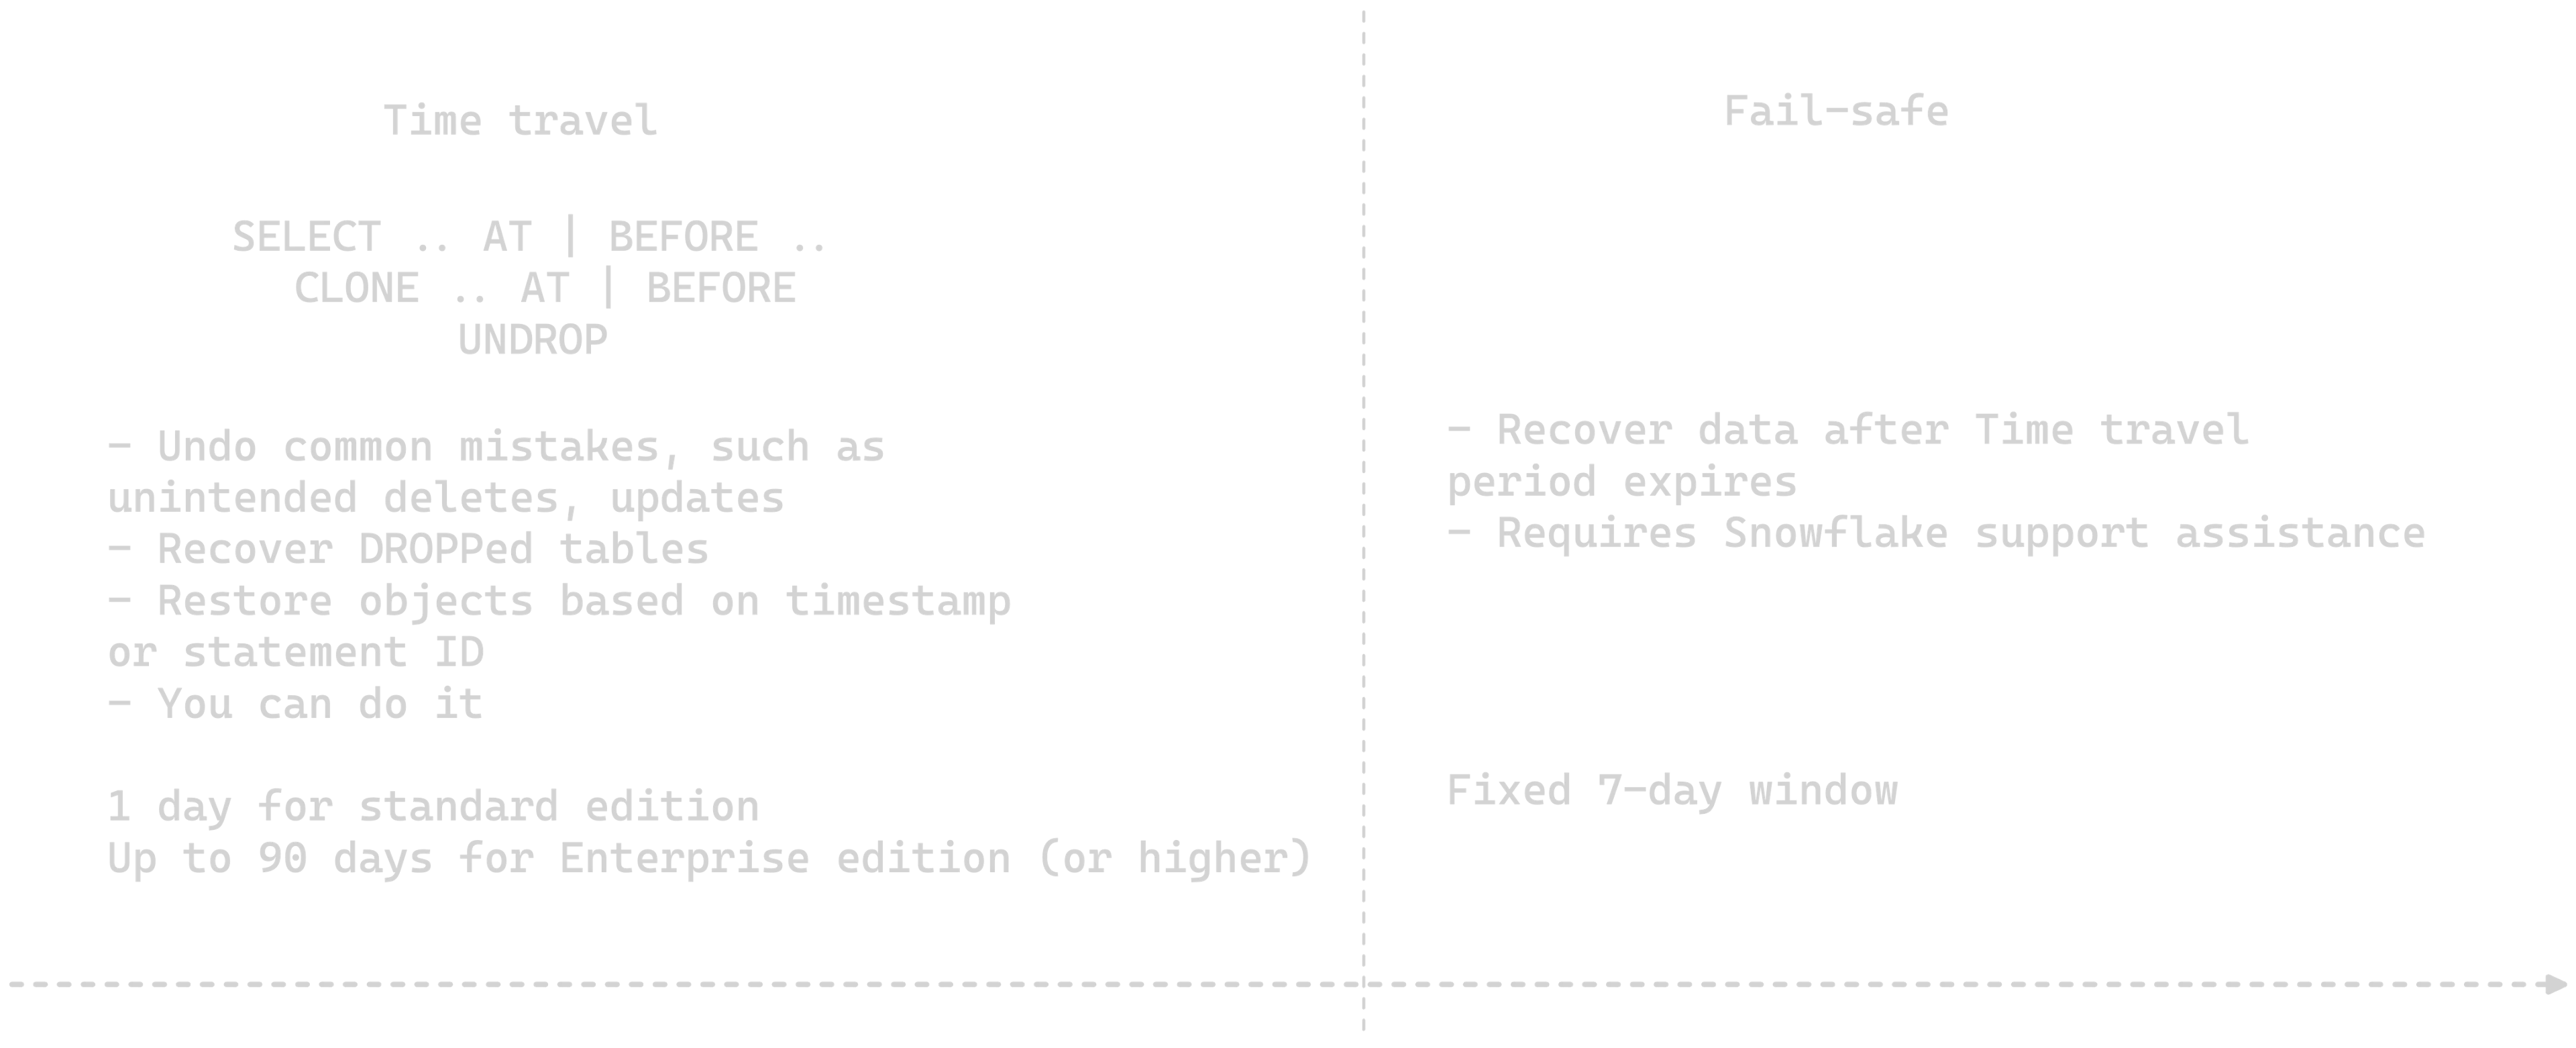
Fail-safe
Once an object's retention period comes to an end, its historical data enters the Snowflake Fail-safe phase. During this phase:
- You won't be able to query historical data anymore.
- Cloning past objects is off the table.
- Restoring objects that were previously dropped becomes impossible.
Fail-safe acts as a safety net, offering a fixed 7-day window where Snowflake might still be able to recover historical data. This critical period kicks in right after the Time Travel retention period ends, giving you one last chance at data recovery, albeit with Snowflake's assistance and under specific conditions. You can read more about the steps required here.
Time Travel example
Here's a Snowflake Time Travel query you can use to restore a previous version of a table where some rows were accidentally updated and deleted:
CREATE TABLE  my_table
as
SELECT
    seq4() id,
    power(id,2) as id_squared
FROM table(GENERATOR(ROWCOUNT => 5)) v;

SELECT id_squared FROM my_table;
Output: id_squared: [0, 1, 4, 9, 16]
UPDATE my_table
SET id_squared = 1;

SELECT id_squared FROM my_table;
Output: id_squared: [1, 1, 1, 1, 1]
You'll need to find the QUERY_ID of the UPDATE statement from the QUERY HISTORY view:
CREATE TABLE my_table_restored CLONE my_table BEFORE(STATEMENT => '01b2c434-0202-6ac2-0000-e9a101e26ae6');
SELECT id_squared FROM my_table_restored;
Output: id_squared: [0, 1, 4, 9, 16]
Once you have the snapshot of your table cloned, you can proceed to swap the two tables if needed:
ALTER TABLE my_table SWAP WITH my_table_restored;
Here's another Snowflake Time Travel example for when a table is accidentally dropped or renamed:
DROP TABLE my_table;
SELECT * FROM my_table; -- ❌ Object 'MY_TABLE' does not exist or not authorized.
UNDROP TABLE my_table;
SELECT * FROM my_table; -- ✅
In these examples, Time Travel allows you to "go back in time" and to correct mistakes such as accidental updates, deletions, or even structural changes to your tables.
Snowflake Time Travel alternative: Git-like version control for data
Time travel is a powerful feature for restoring data objects based on a timestamp value or statement ID. In real-world scenarios, it might be difficult to reconcile to which statement or timestamp you want to revert your schema. Multiple people can issue statements concurrently on the same schema, or even on the same table in a short timeframe. This complicates time travel.
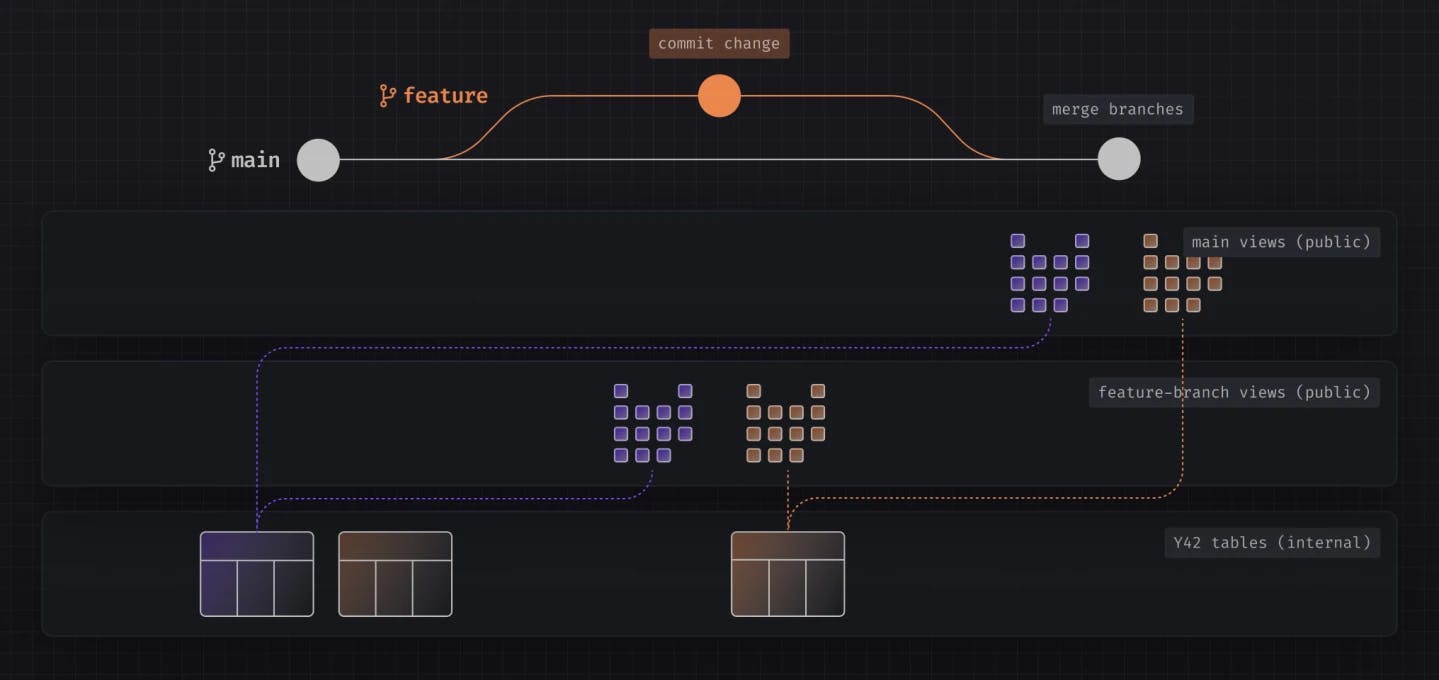
A better solution would be to couple code and data together, restoring the state of your schema based on a commit ID. Y42 provides such a stateful solution that allows you to version control code and manage both data and code together using just Git. This means if you want to roll back your database to a specific version of your code, the data from that point in time is also automatically restored alongside your code changes. This is achieved by maintaining two separate layers in the database, with pointers to all previous snapshots of an object attached to individual commit IDs.
If you want to learn more about what powers this mechanism, you can read about Virtual Data Builds here.
Conclusions
Snowflake offers robust tools to protect your data objects against accidental operations. I still remember the days when you had to perform daily backups, and restoring such a backup would take minutes or hours, depending on the S3 storage class the backup resided in. Then, you'd have to backfill the missing data from when the backup was taken to the current timestamp. Snowflake Time Travel puts all that in the rearview mirror with simple, intuitive SQL commands that allow restoring objects from any time (within a specific timeframe). However, it does so without the ability to tie the object's version from the database to a change in your codebase that caused it. This is where Y42 comes into play. Y42 enables you to maintain your data warehouse and codebase in sync at all times. With Y42, you can deploy or revert code changes, and the state of the data warehouse is automatically synced in a frictionless, zero-copy operation, empowering everyone to make changes to their production system with confidence.
Category
In this article
Share this article
