
Snowflake’s ease of use and wide range of features enable small businesses and large enterprises to efficiently analyze their data and power workloads ranging from traditional BI to data apps and ML use cases. Snowflake is one of the top choices for analytics thanks to its decoupled storage and compute architecture, optimized storage layer, and virtual warehouses.
In this article, we’ll explore practical examples of how to maintain the Snowflake cost at a minimum using some simple yet very powerful techniques and tricks, such as:
- Configure your warehouses efficiently
- Set up alerts with Snowflake resource monitors
- Set query timeouts, lower data retention policies, and use temporary and transient tables
- Configure models incrementally instead of running full refreshes
- Use zero-copy cloning for backups or creating new environments
We will not address individual query performance improvements, like reducing partition scans by removing unnecessary joins or doing filter pushdown. A follow-up article dedicated to query performance will address these and more topics.
Configure your warehouses efficiently
Snowflake warehouses are isolated compute clusters required to run queries, such as loading data into tables or executing transformation queries (DML) on existing data in the data warehouse. Warehouses can be resized, started, and stopped almost instantly. Operations involving only metadata, such as listing the tables in a schema or finding the maximum value on a column, don’t require a warehouse.
Set auto-suspend to 60 seconds
You are billed per second for warehouses, with a minimum charge of 60 seconds each time the warehouse starts. For example, if your warehouse is idle and you execute a query that takes a second to run, starting the warehouse incurs a charge for 60 seconds—likewise, running multiple queries over a span of 1 minute and 1 second results in billing for two minutes.
Warehouses have a setting, AUTO_SUSPEND, to control how long they need to stay awake after issuing the last query. So, even if you are not executing queries, the warehouse will still be active, and you will incur billing. The purpose of this idle time is to leverage the warehouse cache for subsequent queries that might benefit from previous query executions while the warehouse is active.
The default for the setting is 600 – the warehouse automatically suspends after 10 minutes of inactivity. However, it’s best to set it to 60 (1 minute, as that is the minimum amount of time you will be billed once the warehouse is active).
ALTER WAREHOUSE compute_wh SET auto_suspend=60;
Scale down and in your warehouses
You can scale Snowflake warehouses vertically (scale up) or horizontally (scale out) to meet your data workload demands:
- Scale up or using bigger compute clusters is best for processing complex queries.
- Scale out or adding more compute clusters to the warehouse is best for processing concurrent queries. This is also known as using multi-cluster warehouses.
Snowflake warehouses come in T-shirt sizes from X-Small, Small, and Medium up to 5XL and 6XL warehouses. Each time you scale up your warehouse (i.e., from small to medium), you double the number of nodes available in the cluster, thus increasing the number of cores, RAM, and local disks needed to execute the queries. However, you also double the credits utilized per second.
It’s best to start with an X-Small and single cluster warehouse and gradually increase if the performance of queries is suboptimal (scale up by using a bigger cluster) or if too many queries are getting queued often (scale out by adding more clusters to the warehouse).
💡 If the execution time of long-running queries doesn't halve on average when you increase the warehouse size, you'll see diminished returns, as the cost of the new setup will be double.
ALTER WAREHOUSE compute_wh SET warehouse_size=XSMALL;
ALTER WAREHOUSE compute_wh SET min_cluster_count=1;
Putting everything together, when creating a warehouse, we can run with the following defaults:
CREATE WAREHOUSE compute_wh
WITH
    warehouse_size=XSMALL
    min_cluster_count=1
    auto_suspend=60;
To view existing warehouse configurations, use the SHOW WAREHOUSES command or the UI option (Admin -> Warehouses) and tick Auto suspend from the Columns dropdown to include the view.
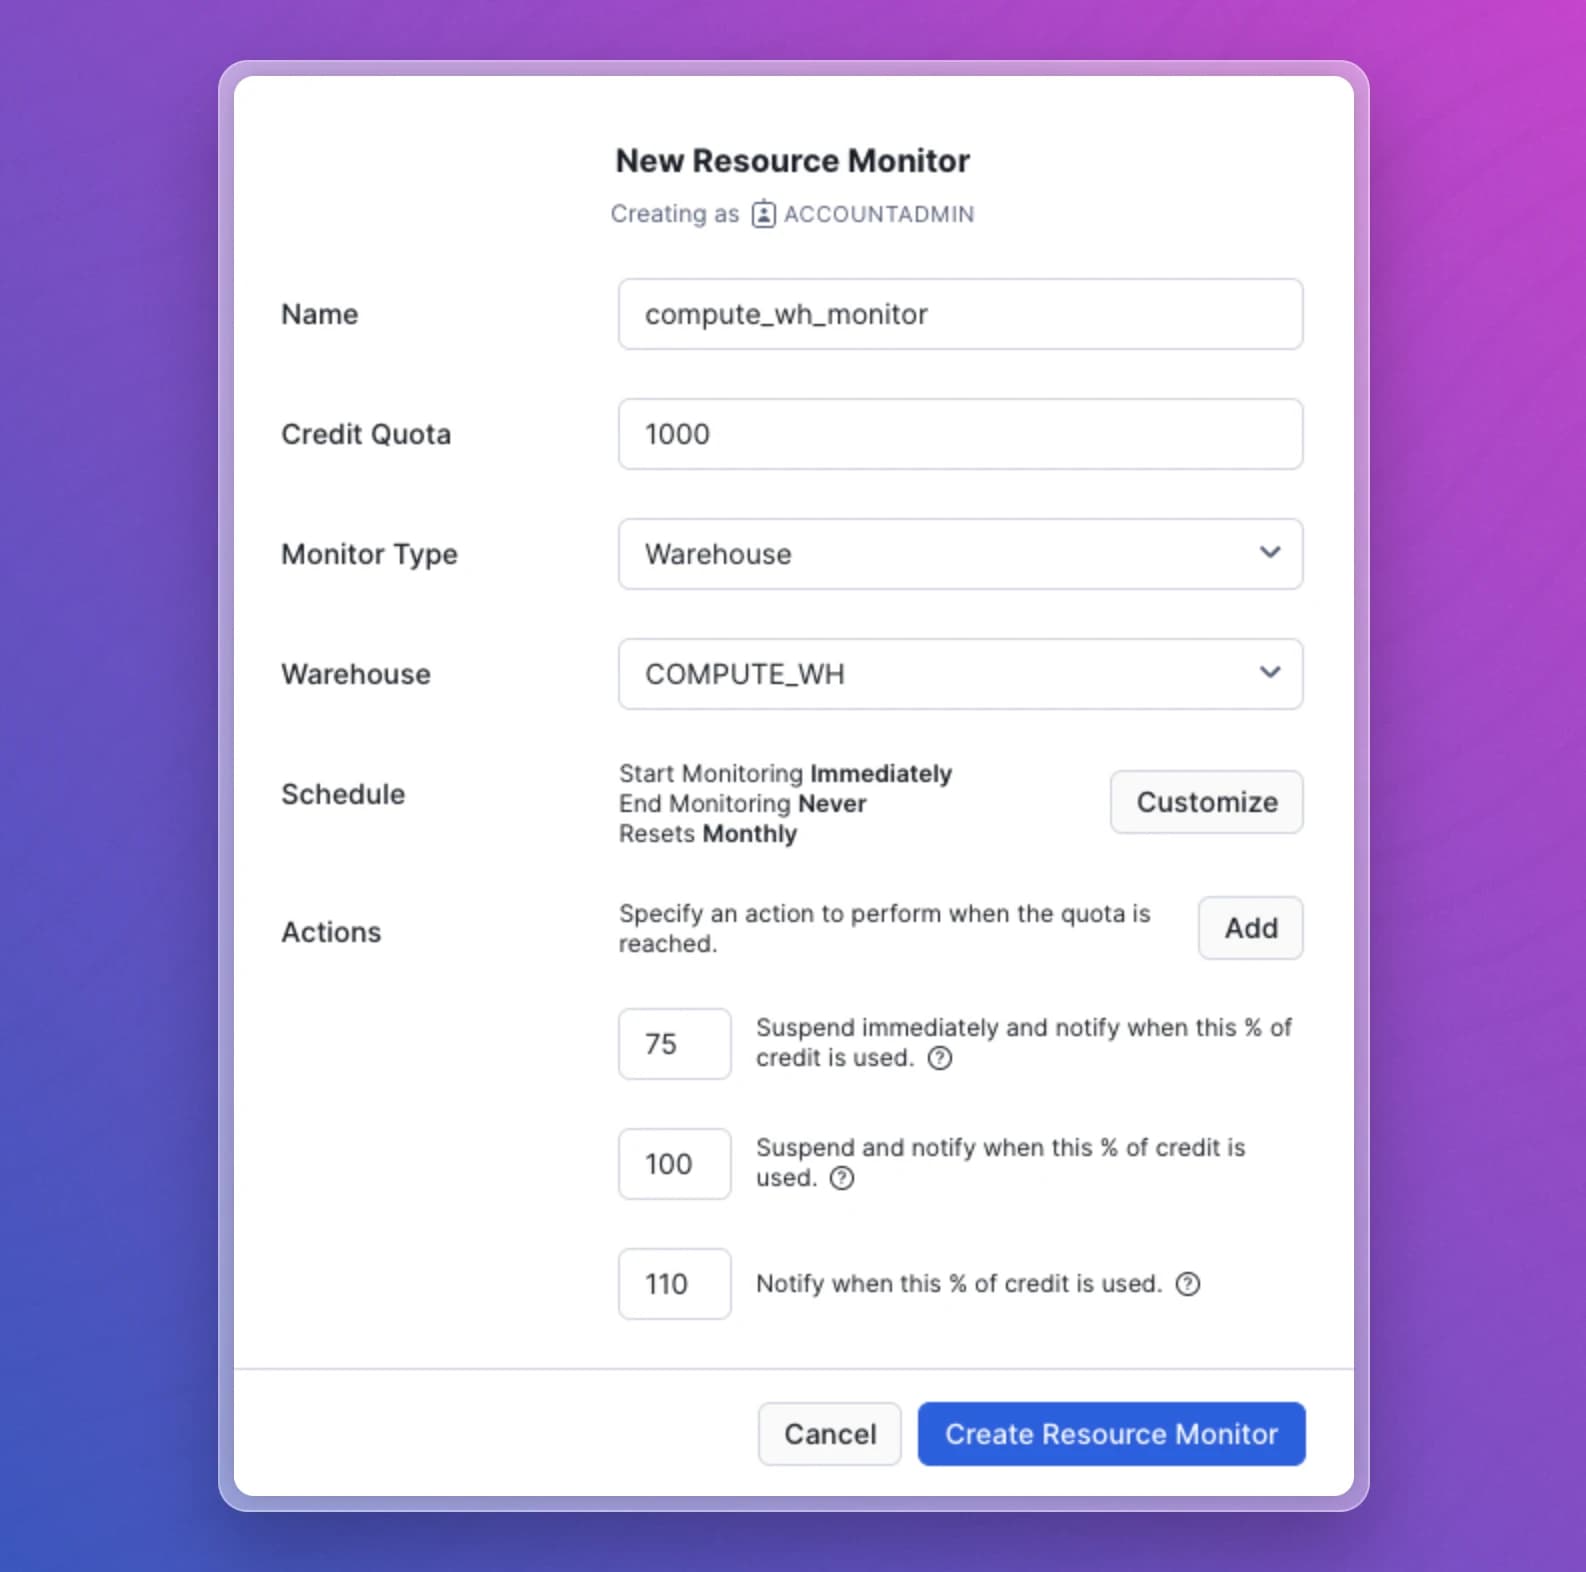
Set up alerts with Snowflake resource monitors
Snowflake resource monitors enable you to monitor warehouses and suspend them once they reach a certain credit quota. Resource monitors can:
- Notify
- Notify and suspend the warehouse after completing all current statements.
- Notify and suspend immediately all current statements.
Resource monitors can be set up at the account level or an individual warehouse level. You can set up only one account-level monitor and multiple monitors for individual warehouses.
You can configure resource monitors via UI from Admin -> Cost Management -> Resource Monitors or via SQL:
CREATE OR REPLACE RESOURCE MONITOR limiter
  WITH CREDIT_QUOTA = 1000
       NOTIFY_USERS = (douglas_adams, arthur_dent)
  TRIGGERS ON 75 PERCENT DO NOTIFY
           ON 100 PERCENT DO SUSPEND
           ON 110 PERCENT DO SUSPEND_IMMEDIATE;
Set query timeouts, lower data retention policies, and use temporary and transient tables
Query timeout
The default query timeout is 172800 seconds or 2 days. The setting enables Snowflake to cancel all queries automatically that run for more extended periods.
However, for most setups, the threshold might be too high – if a query takes over 2 hours, it might be due to missing join conditions that lead to cartesian products. By keeping the default setting of 2 days, you allow those unoptimized queries to continue running until they are complete or the two-day threshold is reached, keeping the warehouse active and incurring additional costs.
To change the value, you can run the following command:
ALTER SESSION SET statement_timeout_in_seconds = 7200; /* session-level query timeout: 2 hours */
ALTER USER douglas_adams SET statement_timeout_in_seconds = 7200; /* user-level query timeout: 2 hours */
ALTER WAREHOUSE compute_wh SET statement_timeout_in_seconds = 7200; /* warehouse-level query timeout: 2 hours */
ALTER ACCOUNT SET statement_timeout_in_seconds = 7200; /* account-level query timeout: 2 hours */
💡 When the parameter is set at multiple levels, the lowest value is enforced.
Data retention policies
Snowflake allows you to revert to any previous snapshot of an object up to 1 day for the Standard edition or 90 days for Enterprise or higher editions using Time travel, with a default of 1 day. If you know you won’t need it, you can turn off the data retention setting for specific objects:
ALTER TABLE stg_customers SET data_retention_time_in_days=0;
ALTER SCHEMA supplychain SET data_retention_time_in_days=0;
ALTER DATABASE ACMEORG SET data_retention_time_in_days=0;
ALTER ACCOUNT SET data_retention_time_in_days=0;
Temporary and transient tables
In addition to the time travel setting, there is a fixed 7-day fail-safe window in which you can recover objects with the help of the Snowflake support team. You cannot turn off this setting for regular tables. However, it is turned off by default for transient tables or temporary tables. If you have previously used temporary tables during processing, you can continue using them or switch to transient tables.
🤷 Temporary vs. transient tables: Temporary tables are removed once the session is closed, whereas transient tables persist until explicitly dropped, similar to regular tables. Both types of tables feature a default data retention of 1 day and have no fail-safe period.
Configure models incrementally instead of running full refreshes
One way to reduce Snowflake costs is to turn your data models into incremental models from being recreated at each run. This way, you can process only new or updated records instead of processing the same data every time.
To create an incremental model, you would only need a date column (append-only models that only insert new data) and/or a unique identifier for your data (in case you also want to update data previously inserted). You can read more about how to configure incremental models with dbt here.
💸 In an append-only model, where new data is only inserted, and no old data needs to be updated, savings can reach up to 95% compared to recreating the model from scratch daily.
💸 In a model where data is inserted daily and, on average, only the records from the last 2 months are updated, the savings can be up to 80% compared to recreating the model from scratch each time.
Use zero-copy cloning for backups or creating new environments.
When setting up new environments or taking backups, use the CLONE command instead of using computation-heavy commands such as create table as select or running COPY commands. The CLONE command is a metadata-only operation, meaning the cloned objects don't contribute to the overall storage until actions are performed on the clone that modify its data.
You can clone databases, schemas, or tables:
CREATE DATABASE dev CLONE prod;
CREATE SCHEMA analytics_dev CLONE analytics;
CREATE TABLE customers_bk_20240301 CLONE customers;
⏩ Since the CLONE command is a metadata-only operation, it doesn't require an active warehouse, thus incurs no Snowflake compute cost. This means with the CLONE command you save both on your Snowflake storage cost and compute cost.
Y42 provides out-of-the-box automatic cloning of environments every time you create a new branch to extend your codebase, so you always work in an isolated zero-copy cloned environment, and your production environments stay untouched until you merge your changes in your production branch.
Conclusion
Snowflake is a great platform, and with the above cost optimization techniques, you can keep your Snowflake spent to a minimum without modifying your ingestion or transformation queries.
To maximize your setup and achieve the best value, we will explore further techniques that improve the query performance in a subsequent blog post. We will explore these in a forthcoming article. Until then, happy SQL’ing!
Category
In this article
Share this article
