
INSERT is one of the three common SQL data manipulation commands, alongside DELETE and UPDATE. The INSERT statement lets you insert one or more rows into a table.
This article will cover the Snowflake INSERT INTO syntax and provide best practices at each step so you can get the most of your Snowflake setup:
- Understanding the Snowflake INSERT INTO syntax
- Single-row inserts, multi-row inserts, and inserts from a table
- Inserting using subqueries and CTEs (Common Table Expressions)
- Overwriting a table
- Inserting into multiple tables at the same time using INSERT ALL
- Parsing and inserting JSON data
- Comparing INSERT INTO and MERGE INTO statements
- Using QUERY_HISTORY table functions and Query Profile
Understanding the Snowflake INSERT INTO syntax
Single-row inserts, multi-row inserts, and inserts from a Table
The basic form of the Snowflake INSERT INTO table command requires specifying the target table and the values you wish to insert. You can insert one or multiple values simultaneously.
CREATE TABLE dim_customers (customer_id bigint, customer_name varchar);
INSERT INTO dim_customers (customer_id, customer_name)
VALUES
(1, 'Douglas Adams'), -- Author of The Hitchhiker's Guide to the Galaxy
(1, 'Arthur Dent'); -- The hapless protagonist of the comic science fiction series The Hitchhiker's Guide to the Galaxy
Similarly, you can also insert data from one table into another:
CREATE TABLE stg_customers(id bigint, name varchar);
INSERT INTO dim_customers (customer_id, customer_name)
SELECT
stg.id as customer_id,
stg.name as customer_name
FROM
stg_customers stg;
Although optional, it is highly recommended to explicitly specify column names in both the INSERT and SELECT clauses. Using INSERT INTO target_table SELECT * FROM source_table can lead to errors if the schemas of the two tables diverge. For instance, this can happen when you add a column to the source table but forget to update the target table.
What's worse, if you add columns to both tables but in different orders, the insert operation will succeed if their data types match. But the inserted data will end up in the wrong columns—a debugging nightmare.
tl;dr Always specify column lists or use a platform like Y42 that auto-detects the schema and can automatically pre-fill column names in your queries.
Insert from CTE (Common Table Expressions)
For INSERT statements with complex insertion logic, breaking it down with Common Table Expressions (CTEs) can make your queries more manageable. Here's an example that demonstrates how to use a CTE to aggregate customer order data from a staging table (stg_orders) before inserting the summary into an order summary table (dim_order_summary):
INSERT INTO dim_order_summary (customer_id, total_orders, total_amount_spent)
WITH customer_order_summary AS (
    SELECT
        stg.customer_id,
        COUNT(*) AS total_orders,
        SUM(stg.order_amount) AS total_amount_spent
    FROM stg_orders stg
    GROUP BY customer_id
)
SELECT
    customer_id,
    total_orders,
    total_amount_spent
FROM customer_order_summary;
💡 The CREATE TABLE statements for the two tables can be found here.
Insert with subqueries
A common pattern to prevent inserting duplicate data is verifying that the record is not in the target table. There are several methods to achieve this, but one popular approach is to use a subquery with a NOT EXISTS clause.
INSERT INTO dim_customers (customer_id, customer_name)
SELECT
    stg.id as customer_id,
    stg.name as customer_name
FROM
    stg_customers stg
WHERE NOT EXISTS (
    SELECT 1 FROM dim_customers dc WHERE dc.customer_id = stg.id
);
The above query only inserts new IDs. If the ID in the staging table is already present in the target table, then the row for the corresponding ID is not inserted. Therefore, running it several times on the same staging data won’t insert new data into the target table.
💡 If executing an operation multiple times yields the same result as if it was executed just once, it means the operation is idempotent.
Using INSERT OVERWRITE INTO
Snowflake allows the OVERWRITE option to be specified when inserting data. This means each time the INSERT operation runs, it first clears the target table and then performs the insert, effectively combining a TRUNCATE and INSERT into a single atomic command. However, it's advisable to proceed cautiously and explicitly perform the truncate and insert operations separately so you don’t accidentally overlook the OVERWRITE keyword and unintentionally wipe your data.
You can recover data using Snowflake’s Time Travel and Clone features.
INSERT OVERWRITE INTO dim_customers (customer_id, customer_name)
SELECT
    stg.id as customer_id,
    stg.name as customer_name
FROM
    stg_customers stg;
The insert overwrite Snowflake option is great if the data volume is relatively low and you recompute your tables in full at every run.
Inserting into multiple tables at the same time
Snowflake allows you to insert into multiple tables using a single INSERT statement:
INSERT ALL
    INTO dim_customers(customer_id, customer_name) VALUES (customer_id, customer_name)
    INTO dim_customers_audit(customer_id, customer_name,inserted_at) VALUES (customer_id, customer_name, created_at)
SELECT
    stg.id as customer_id,
    stg.name as customer_name,
    current_timestamp as created_at
FROM
    stg_customers stg;
You can also use conditions, such as WHEN <condition> THEN INTO table_name ... However, it’s important to note that the INSERT ALL syntax is not supported by all database vendors. Instead, consider using separate INSERT statements within a transaction for similar functionality.
We suggest using standard ANSI SQL as much as possible in your queries to avoid getting locked into vendor-specific syntax.
Parse and Insert JSON Data
Let's explore how to insert raw JSON data into a Snowflake table and then query it. We can utilize the PARSE_JSON function to convert JSON-formatted strings into the VARIANT type, which is Snowflake's data type for storing semi-structured data, such as JSON. This data type allows for efficient data storage and retrieval without adhering to a fixed schema upfront.
CREATE TABLE customer_preferences (
    customer_id INT,
    preferences VARIANT
);

INSERT INTO customer_preferences (customer_id, preferences)
SELECT
    1, PARSE_JSON('{"contact_method": "email", "favorite_categories": ["books", "electronics"], "newsletter_opt_in": true}')
UNION ALL
SELECT
    2, PARSE_JSON('{"contact_method": "sms", "favorite_categories": ["apparel", "home goods"], "newsletter_opt_in": false}');
Once inserted, we can query specific elements within the JSON data or filter based on its content:
SELECT
    preferences:contact_method::VARCHAR,
    preferences:favorite_categories::ARRAY[0], /* Access the first favorite category from the array */
    preferences:newsletter_opt_in::VARCHAR
FROM customer_preferences
WHERE preferences:newsletter_opt_in::BOOLEAN = TRUE;
💡 Ensure input JSON strings are correctly formatted to prevent errors during INSERT.
INSERT INTO vs. MERGE INTO statement
When you need to also update and/or delete records from your target table, you have two primary options:
- Use individual INSERT, UPDATE, and/or DELETE statements
- Use the MERGE statement that combines INSERT, UPDATE, and DELETE statements.
The MERGE INTO statement is atomic, meaning it treats all operations as a single transaction. This ensures that all parts of the MERGE operation either complete successfully together or fail together without leaving the database in an inconsistent state.
For example, imagine a banking app updating an account balance while also recording the transaction. If the app uses MERGE INTO and something goes wrong, either both the balance update and the transaction record are successfully completed, or neither happens, preventing any chance of your account showing a debit with no corresponding transaction record.
The blueprint of the Snowflake MERGE statement is:
MERGE INTO <target_table>
USING <source> ON <join_expr>
{ matchedClause | notMatchedClause } [ ... ]
Where:
matchedClause== UPDATE and/or DELETE clausesnotMatchedClause== INSERT clause- matchedClause = UPDATE and/or DELETE clauses
- notMatchedClause = INSERT clause
Let’s look at an example of syncing dim_customers with stg_customers data. We will use a condition to delete from dim_customers if a row is flagged for deletion in the source, update if the primary key matches in both tables, and insert if the row is present in the staging table, but not in the dimension table.
CREATE TABLE dim_customers (customer_id bigint, customer_name varchar);
CREATE TABLE stg_customers(id bigint, name varchar, marked_for_deletion BOOLEAN DEFAULT FALSE);

MERGE INTO dim_customers d
USING stg_customers s
ON d.customer_id = s.id
WHEN MATCHED AND s.marked_for_deletion = TRUE THEN
    DELETE
WHEN MATCHED AND d.customer_name != s.name THEN
    UPDATE SET d.customer_name = s.name
WHEN NOT MATCHED THEN
    INSERT (customer_id, customer_name)
    VALUES (s.id, s.name);
First, let’s insert a few rows in both the stg_customers and dim_customers tables:
INSERT INTO dim_customers (customer_id, customer_name)
VALUES
    (1, 'John Doe'),
    (2, 'Jane Smith');

INSERT INTO stg_customers (id, name, marked_for_deletion)
VALUES
    (1, 'John Doe', FALSE),  -- Existing customer, no change
    (2, 'Jane Doe', FALSE),  -- Existing customer, name change
    (3, 'Mike Brown', FALSE); -- New customer
stg_customers:

dim_customers:

Running the MERGE statement from above, adds the new customer with ID = 3, and updates the second customer name from Jane Smith to Jane Doe, but doesn’t delete any row since all rows have marked_for_deletion set to FALSE in the staging table.
MERGE INTO dim_customers d
USING stg_customers s
ON d.customer_id = s.id
WHEN MATCHED AND s.marked_for_deletion = TRUE THEN
    DELETE
WHEN MATCHED AND d.customer_name != s.name THEN
    UPDATE SET d.customer_name = s.name
WHEN NOT MATCHED THEN
    INSERT (customer_id, customer_name)
    VALUES (s.id, s.name);
dim_customers:

Let’s run it again with new data in the staging table:
TRUNCATE TABLE stg_customers;
INSERT INTO stg_customers (id, name, marked_for_deletion)
VALUES
    (2, 'Jane Doe Updated', FALSE),  -- Existing customer with name update
    (3, 'Mike Brown', FALSE),        -- Existing customer with no change
    (4, 'Emily Clark', FALSE),       -- Another new customer
    (1, 'John Doe', TRUE);           -- Marking this customer for deletion
stg_customers:

MERGE INTO dim_customers d
USING stg_customers s
ON d.customer_id = s.id
WHEN MATCHED AND s.marked_for_deletion = TRUE THEN
    DELETE
WHEN MATCHED AND d.customer_name != s.name THEN
    UPDATE SET d.customer_name = s.name
WHEN NOT MATCHED THEN
    INSERT (customer_id, customer_name)
    VALUES (s.id, s.name);
This time, after we rerun the MERGE statement:
- 1 row will be inserted (
Emily Clarkwith ID = 4) - 1 row will be updated (
Jane Doe Updatedwith ID = 2) - 1 row will be deleted (
John Doewith ID = 1 and marked_for_deletion = TRUE)
dim_customers:

To replicate the above using DELETE, INSERT, and UPDATE statements, we would need to write the following statements:
DELETE FROM dim_customers d
USING stg_customers s
WHERE d.customer_id = s.id AND marked_for_deletion = TRUE;

UPDATE dim_customers d
SET d.customer_name = s.name
FROM stg_customers s
    WHERE s.id = d.customer_id
AND s.name != d.customer_name;

INSERT INTO dim_customers (customer_id, customer_name)
SELECT s.id, s.name
FROM stg_customers s
LEFT JOIN dim_customers d ON s.id = d.customer_id
WHERE d.customer_id IS NULL AND s.marked_for_deletion = FALSE;
QUERY_HISTORY and Query Profile
You might wonder whether using MERGE makes the query more performant. After all, it scans each table once instead of three times, as would be the case when using three separate statements: DELETE, UPDATE, and INSERT.
You can query the QUERY_HISTORY table function to validate this:
SELECT
*
FROM table(information_schema.query_history())
ORDER BY start_time DESC;
By default, this query retrieves the latest 100 queries. You can increase the limit by passing the RESULT_LIMIT argument to the table function.
To focus on the current session queries, you can use the query_history_by_session() table function instead:
SELECT
query_id, query_text, query_type, total_elapsed_time, bytes_scanned, rows_produced
FROM table(information_schema.query_history_by_session())
WHERE lower(query_text) NOT LIKE 'select%' AND lower(query_text) NOT LIKE 'truncate%'
ORDER BY start_time DESC;

Alternatively, you can also click on Monitoring in the left sidebar -> Query History. The Query Profile offers additional insights, such as the breakdown of time spent executing a specific query, by inspecting the Query Profile for each query.
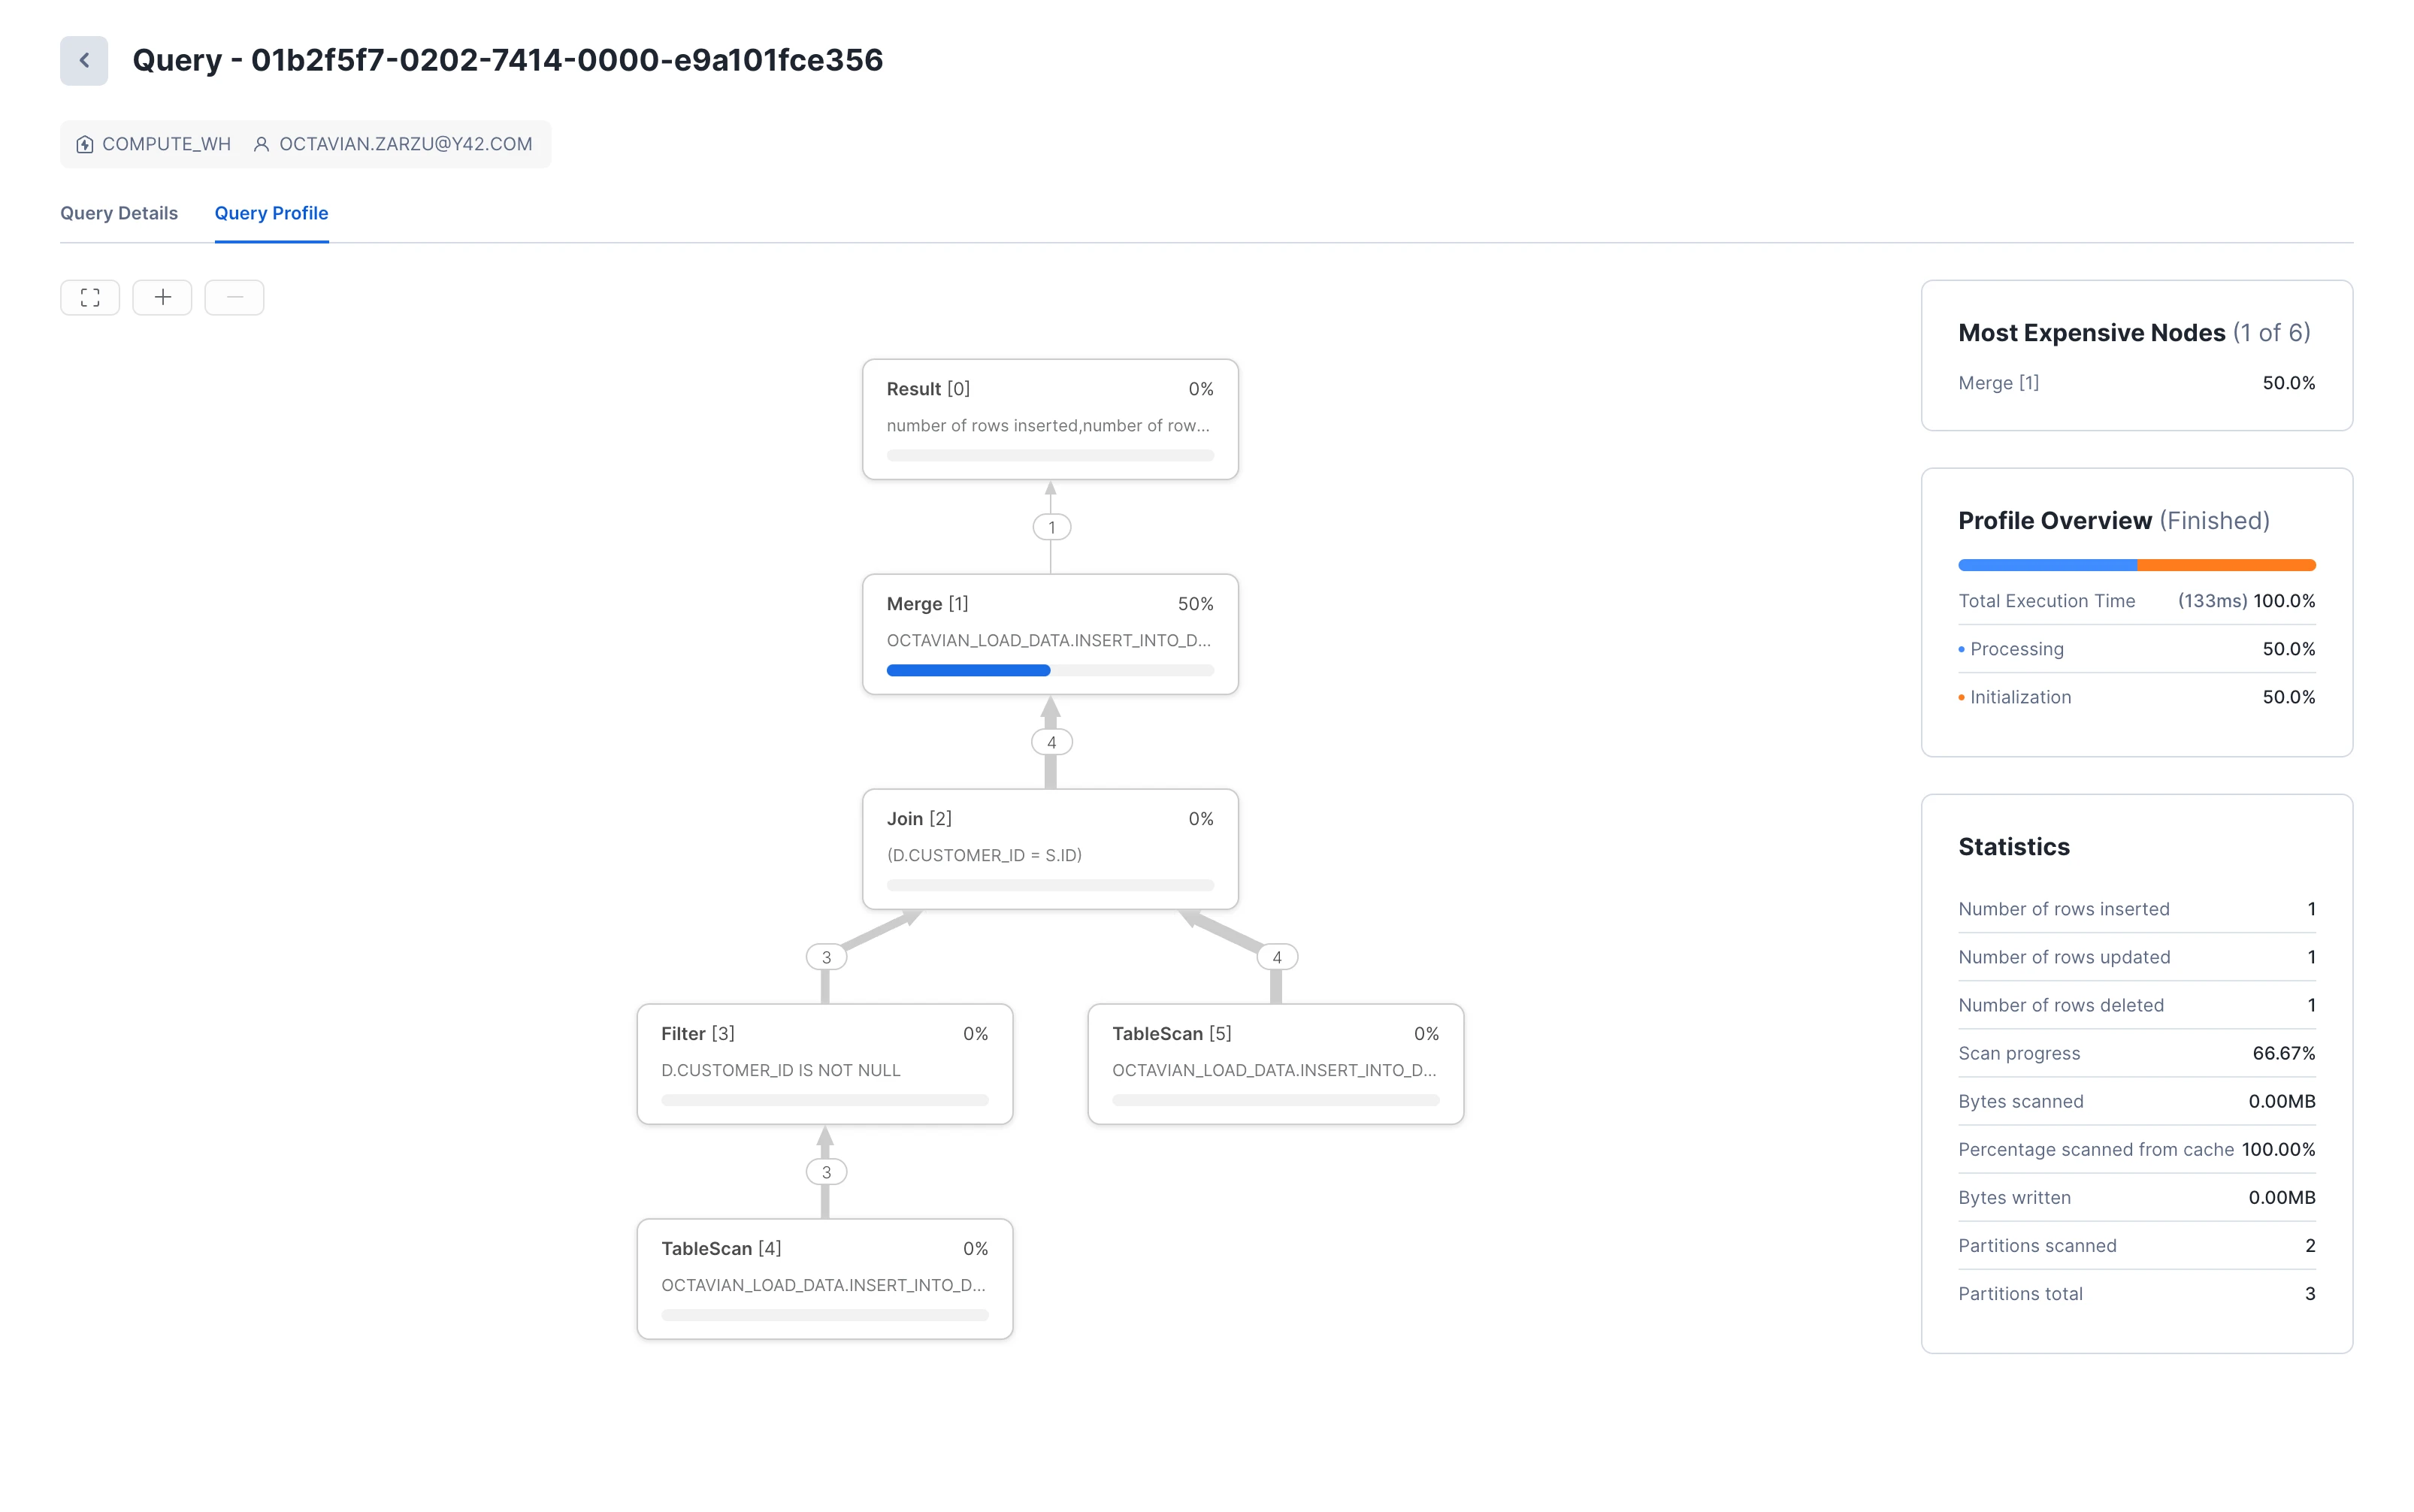
For this simple use case, MERGE is slightly more performant. However, it’s best to verify this for your specific scenario. Various sources [(1), (2)] suggest that the MERGE statement might be slower than executing individual statements. You should also consider code readability, how it relates to your overall codebase, and how the use case will evolve, such as the need to join in different tables for the INSERTING versus UPDATING part. In such cases, separating the MERGE operation into individual statements might be better.
Conclusions
In this article, we’ve explored how to insert into Snowflake data, covering everything from basic insert statements, to parsing and inserting JSON data, to complex data synchronization statements using the MERGE statement. Using INSERT vs. MERGE depends on your use case, performance, code readability, and consistency. The QUERY_HISTORY table function and Query Profile view can shed light on query performance and guide you toward making a more informed decision.
As you familiarize yourself with Snowflake syntax variations, you will be able to leverage Snowflake to its full potential and meet your data objectives.
Category
In this article
Share this article
