
What is dimensional modeling?
If you’re a data practitioner, then you’re probably familiar with dimensional data modeling. The concept of data modeling was created by Ralph Kimball in 1996 and continues to be a prominent practice used today, especially with the rise of data transformation using tools like dbt.
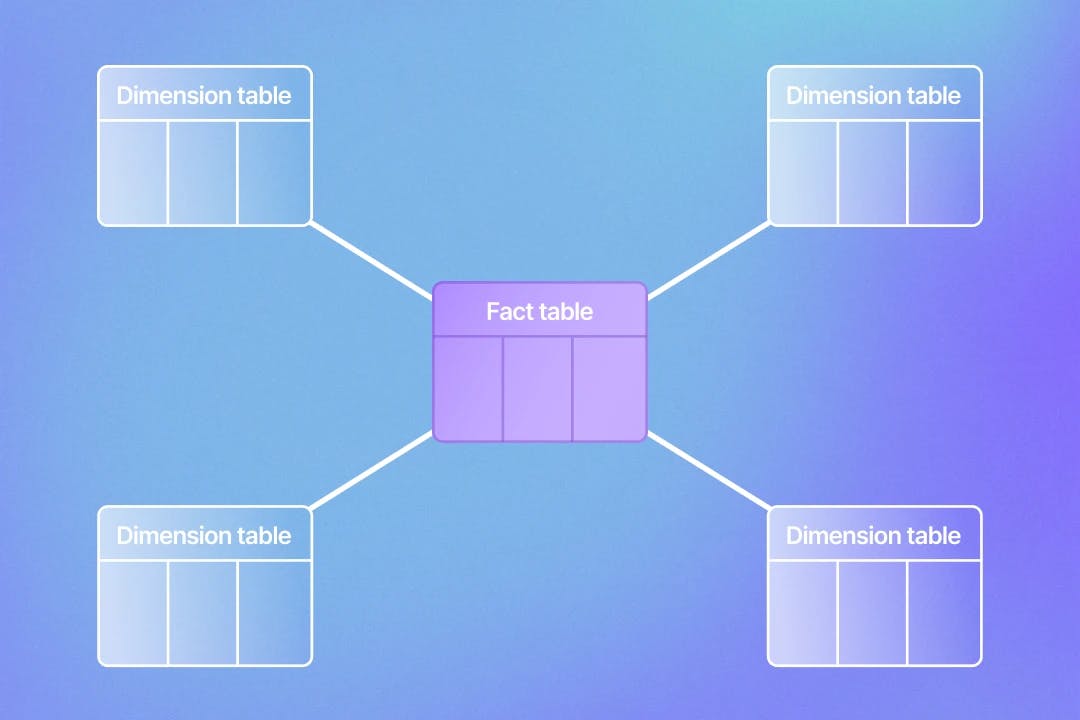
Dimensional modeling is a technique that organizes data into fact and dimension tables within a data warehouse. Together, these two types of tables represent a holistic view of a business.
Fact Tables
According to Kimball, fact tables used in dimensional data modeling represent a business process. In a fact table, each row of data represents a business event. You can think of fact tables as being more action or event-driven rather than focused on qualitative data.
For example, if a customer places an order on your website, this would be represented as a row within a fact table in your data warehouse. Other actions like marketing campaigns clicked and new account signups are examples of business events that would also be modeled within a fact table.
Dimension Tables
With Kimball data modeling, dimension tables are tables that describe a business process. These tables contain details about the business events represented in fact tables. If you were to look at the primary key of a dimension table in your data warehouse, this primary key would be found as a foreign key in a fact table.
Let’s use the same example of a customer placing an order on your website. While the fact table contains the data of the specific event, a dimension table will contain the specific details around this event. For example, a fact table would contain a foreign key product_id that maps back to a product_id field in a dimension table.
In the related dimension table within the data warehouse, this product_id field would be the primary key. The fields in this table would then describe the product type, product name, product color, and any other important details about this product.
Creating fact and dimension tables in dbt
dbt is a data transformation tool that allows you to write automated, reproducible data models to populate your data warehouse. dbt is commonly used by analytics engineers who do the majority of the dimensional modeling. The tool helps to make writing transformations and defining foreign keys between models a seamless process.
Now that you understand fact and dimension tables in the context of Kimball’s method for data modeling, let’s discuss how to create these tables using dbt.
1. Write staging models for each of your raw data sources.
Writing staging models for each of your raw data sources is a dbt best practice. This allows you to create a view that references your raw data so you can use this in your models rather than selecting from your raw data directly. In turn, you will always have a copy of your raw data that cannot be accidentally overwritten (talk about a good data governance practice!). Staging models follow standardization best practices like casting data types and renaming columns using company naming conventions. Even with these basic transformations, staging models should only ever select from your raw data sources! When using dbt, you need to select from a defined source using the following configuration:
{{ source(‘<source name in YAML file>’, ‘<table name in YAML file>’ }}
Keep in mind that this source also needs to be defined in a YAML file. The names you use in this configuration are the names you give a schema and its table in the documentation.
If we have a schema named application_raw within our data warehouse and a table in this schema named orders, we would define this source like so in a sources.yaml file:
version: 2
sources:
  - name: application_raw_data
    database: prod
    schema: application_raw
    tables:
      - name: orders
        table_type: view
        description: "Details on orders placed and their characteristics"
        columns:
          - name: id
            description: "Unique ID for an order"
          - name: created_at
            description: “The timestamp that the order was placed
  - name: type
    description: “Unique ID of an order type”
  - name: product
    description: “Unique ID of a product”
  - name: user
    description: “Unique ID of a user”
Then, we would create a staging model named stg_application_raw__orders.sql with the following code:
SELECT
        id AS order_id,
        created_at::timestamp AS order_created_at,
        type::int AS order_type_id,
        product::int AS product_id,
        user::int AS user_id
FROM {{ source(‘application_raw_data’, ‘orders’) }}
Now we can reference this staging model in the fact and dimension models we will build.
2. Write dimension models- join together related tables.
When writing a model that will create a dimension table, you will be joining together related tables to build out a table with all of the details of a business event. If you look in the staging model we wrote for orders, you can see there is a foreign key for product_id. We will be writing a dimension model for products that will then be able to be joined to our orders fact model to get details about the products in an order.
Creating a model that produces a dimension table is essentially a bunch of left joins on the keys that these tables have in common. We would write our dim_products.sql model like this:
SELECT
        products.product_name,
        products. product_category,
        products.product_last_stocked_at,
        Product_types.product_type_name,
        colors.color_name AS product_color_name
FROM {{ ref(‘stg_application_raw__products’) }} products
        ON order.product_id = products.product_id
LEFT JOIN {{ ref(‘stg_application_raw__product_types’) }} product_types
        ON products.product_type_id = product_types.product_type_id
LEFT JOIN {{ ref(‘stg_application_raw__colors’) }} colors
        ON products.product_color_id = colors.color_id
You can see here that this dimensional model contains all details about a product. This way, analysts will be able to query this model instead of needing to join all of these related tables in the BI layer. This is one of the main benefits of having dimension tables within your data warehouse!
3. Write fact models- piece together business events.
When writing fact models, you are piecing together business logic that represents the business event that you are trying to model. This transformation logic is often much more complex than the simple left joins used in dimension models.
Continuing with our orders example, we will be using the stg_application_raw__orders model we wrote above to act as a fact model. In this example, we can model orders as a fact table by simply selecting from the staging model.
SELECT
        orders.order_id,
        orders.order_created_at,
        orders.product_id,
        orders.product_quantity,
        orders.user_id
FROM {{ ref(‘stg_application_raw__orders’) }} orders
Here, we only include the unique identifiers that can be joined back to their corresponding dimension models in order to get more details about the order.
For example, product_id will be used to join our dim_users dimension model to get more product details such as the product name, product type name, and product color.
4. Create a surrogate key for each table that can be used to join fact and dim models together.
Because you are creating these new types of models, they may no longer have a true primary key like the source tables do. To identify a unique row in a table, its essential to generate a surrogate key that indicates uniqueness.
Surrogate keys also allow you to join together fact and dimension tables with minimal effort or understanding. Luckily, dbt makes generating surrogate keys super easy by offering a generate_surrogate_key macro in the dbt_utils package.
This macro takes one or more unique columns as input and uses those to generate a unique hash key for each row in a dimensional data model.
For dimension tables, there is typically a single unique column taken as input. Fact models can be more complicated and have a few columns that together make a row unique, meaning the surrogate key would be comprised of a few columns rather than just one.
If we were to use this macro to generate a surrogate key for our dimension model written above, it would look like this:
SELECT
        {{ dbt_utils.generate_surrogate_key(['Orders.order_id']) }} as order_key,
        Orders.order_id,
        Orders.order_created_at,
        Order_types.order_type_name,
        Products.product_name,
        products. Product_category,
        Products.product_last_stocked_at,
        Users.first_name,
        Users.last_name,
        Users.email
FROM {{ ref(‘stg_application_raw__orders’) }} orders
LEFT JOIN {{ ref(‘stg_application_raw__order_types’) }} order_types
        ON orders.order_type_id = order_types.order_type_id
LEFT JOIN  {{ ref(‘stg_application_raw__products’) }} products
        ON order.product_id = products.product_id
LEFT JOIN {{ ref(‘stg_application_raw__users’) }} users
        ON orders.user_id = users.user_id
Because we know order_id is the primary key of the dimension model, we then use that with the generate_surrogate_key macro to create the table’s surrogate key.
When doing this in a fact model, not only do you need to create a surrogate key for the unique columns in the model, but you also need to create it for any unique identifiers that will be joined back to dimension models.
For example, if our fact model contains the column product_type_id, which maps to the product_types dimension model, we would also need to generate a surrogate key on the product_type_id column, like so:
{{ dbt_utils.generate_surrogate_key(['prouct_type_id']) }} as product_type_key
Now, you can easily join fact and dimension models using these dbt-generated foreign surrogate keys.
5. Document your dimension and fact models.
Now that you’ve written the transformations for your dimension and fact models, you want to make sure you properly document them within dbt. This will help other analytics engineers and data analysts understand the purpose of the data model and its fields.
I recommend documenting these models while writing them when the logic of the transformations is fresh in your head. I can’t tell you the number of times I’ve waited to do this only to forget why I wrote something the way I did!
Similar to the staging models, you want to document these models within YAML files. However, instead of in the sources.yml file, you will want to document these in a corresponding models.yml file.
For the dimension model we created above, the documentation would look like this:
version: 2
models:
  - name: dim_orders
    description: "Contains all details on an order"
    columns:
      - name: order_id
        description: "Unique ID for an order"
      - name: order_created_at
        description: “The timestamp that the order was placed
      - name: order_type_name
        description: “The name of the order type”
      - name: product_name
        description: “The name of the product in the order”
      - name: product_category
        description: “The category the product in the order is listed under on the website”
      - name: product_last_stocked_at
        description: “The timestamp the product in the order was last stocked in the warehouse”
      - name: first_name
        description: “The first name of the user who placed the order”
      - name: last_name
        description: “The last name of the user who placed the order”
      - name: email
        description: “The email of the user who placed the order”
Be sure to also document your fact tables like this! The more you document during the coding process, the more clarity you will have when using the model in the future.
6. Specify a materialization for your dimensional data models.
Lastly, after you’ve written your dimensional models and thoroughly documented them within dbt, you need to specify a materialization. This refers to how your data models are built in your data warehouse.
While it is most common for staging, intermediate, and dimension models to exist as views in your data warehouse, it depends on your specific use case. These models are already pretty performant, or maybe not directly queried in the case of intermediate models, so it makes sense for them to be views. However, I’ve seen analytics engineers materialize their dimension models as tables as well.
As for fact tables, which are often quite complex, it makes sense to materialize them as tables or incremental models. Incremental models are built incrementally, appending data to an already-existing table rather than completely overwriting data each time it is built. They are great for very large tables that experience performance issues.
To specify how a model is materialized, you can add a config block under the model in the YAML file it is documented in. Then, you simply specify the materialization in a materialized block.
version: 2
models:
  - name: dim_orders
    description: "Contains all details on an order"
    config:
      materialized: view
    columns:
      - name: order_id
        description: "Unique ID for an order"
      - name: order_created_at
        description: “The timestamp that the order was placed
      - name: order_type_name
        description: “The name of the order type”
      - name: product_name
        description: “The name of the product in the order”
      - name: product_category
        description: “The category the product in the order is listed under on the website”
      - name: product_last_stocked_at
        description: “The timestamp the product in the order was last stocked in the warehouse”
      - name: first_name
        description: “The first name of the user who placed the order”
      - name: last_name
        description: “The last name of the user who placed the order”
      - name: email
If you’d prefer to define the materialization directly within the dbt model, you can also add this configuration to the top of your mode’s SQL file:
{{ config(materialized='view') }}
Now, whenever you run this model, it will be built as a view in your data warehouse!
Conclusion
dbt is a data transformation tool that makes the dimensional modeling process easier by automating the way your models are run. When paired with data platforms like Y42, it becomes even more powerful. Y42 and dbt together allow you to perform the 6 steps above quickly and efficiently, helping to create the most robust data warehouse.
After using dimensional data modeling, you will have a simpler data environment for analytics engineers and data analysts to use in their analytics work. Business questions will be able to be answered more easily now that your data directly mimics business events. Not to mention your dashboards and reports will refresh much faster due to the increased performance these dimensional models give to your queries.
Category
In this article
Share this article
